How to Record Your Screen on Mac, Apple TV, and iOS Devices
Ready to start recording your screen? Whether you’re using a Mac, Apple TV, or an iOS device, this guide will walk you through the process of capturing your screen’s content efficiently.

Recording Your Mac’s Screen
To begin recording on your Mac, follow these steps:
- Open QuickTime Player: Launch QuickTime Player from your Applications folder.
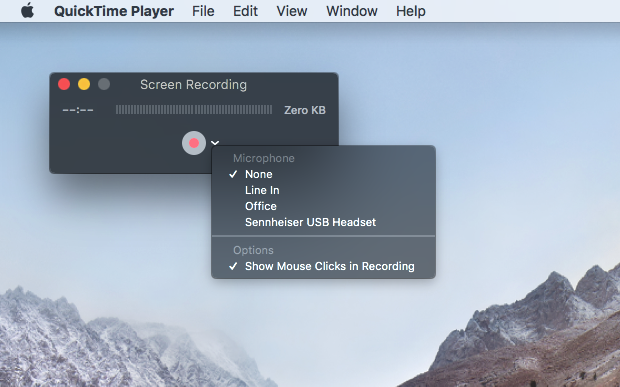
- Start Screen Recording: Navigate to
File>New Screen Recording. The Screen Recording window will appear.
Thinking about subscribing to IPTV?

Configure Your Settings: Click the downward-facing arrow next to the record button. Here, you can select a microphone to add a voiceover or enable the option to show mouse clicks with a black circle around the pointer.Begin Recording: Click the large record button. You can either click to start recording the entire screen or drag to select a specific area to record. Once satisfied with your selection, click Start Recording.

- Stop Recording: When you’ve finished, click the stop button in the menu bar. Your recording will automatically open in QuickTime Player.
Editing and Saving Your Video
- Save Your Recording: Before editing, save a copy of your recording by going to
File>Save. - Trim the Video: To edit, go to
Edit>Trim(Command+T). Use the yellow handles to adjust the start and end points of your video. For full-screen recordings, you might want to remove the portion where you stop the recording.

- Save or Duplicate: If you’re sure you don’t need the trimmed footage, save the changes by going to
File>Save(Command+S). Alternatively, duplicate the clip by selectingFile>Duplicateand save the copy. - Export Options: For large files, consider using
Export As…to save the video in a lower resolution if necessary. For YouTube uploads or iCloud sharing, maintain the original quality.
Recording Your Apple TV’s Screen
Recording from an Apple TV involves a few extra steps:
- Connect Your Apple TV: Your Apple TV must be connected via HDMI. For the fourth-generation model, use a USB-C cable. For Apple TV 4K, connect through the same Wi-Fi network as your Mac.
- Pair Devices: On macOS Sierra, use Xcode (available on the Mac App Store) to pair your Apple TV with your Mac. Go to
Window>Devices and Simulatorsin Xcode. On your Apple TV, navigate toSettings>Remotes and Devices>Remote App and Devices, and enter the PIN displayed on the Apple TV.
Setting Up IPTV on rIPTV: Easy Steps to Follow

- Start Recording: Open QuickTime Player, go to
File>New Movie Recording. Select your Apple TV from the Camera and Microphone options. Choose a quality setting (High or Maximum) and start recording. - Record on macOS High Sierra: On macOS High Sierra, select your Apple TV from the Camera options and enter the code shown on your Apple TV. Confirm the recording on your Apple TV.
Recording Your iPhone or iPad’s Screen
From iOS 11 onwards, you can record your iPhone or iPad screen directly:
- Enable Screen Recording: Go to
Settings>Control Center>Customize Controls, and tap the+next to Screen Recording. - Start Recording: Access Control Center by swiping from the bottom of the screen. Tap the screen recording button. You’ll see a three-second countdown before recording begins. To stop, tap the red bar at the top of the screen or press the button in Control Center again. Your video will be saved to the Photos app.
For iOS 10 devices, connect your iPhone or iPad to your Mac via USB and use QuickTime Player’s method for recording an Apple TV.
Step-by-Step Guide to Setting Up IPTV on Kodi


